I promised a thread about taking off the skin.
First, I need to explain that Scully, the Pleo I took the skin off, was bought as a 'bricked' or non working Pleo, and when he arrived I could see that somebody had already had a go at removing the skin around his battery compartment and his back feet. This meant that it's harder for me to explain what you'll find when you try those areas, as my experience might not be exactly the same. However, the front feet were untouched and are exactly the same as the back ones, you just might find it a bit more difficult to make a start on pulling the skin away from the battery area on the belly of the beast.
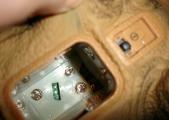 |
And that was where I started. I did go into this with a scalpel to hand to cut the rubber/glue away, but actually it was not necessary. The Pleo skin is only really glued around the openings, and I found the my thumbnail did the job perfectly - the combination of pulling the skin with one hand and using your nail and then just pushing at the edges with your fingertips works beautifully and does the least damage. I'm intending to replace the skin later, so I was particularly keen on keeping the skin as intact as possible. The big advantage in this area, on the belly, is that it's the widest, flattest surface available to you for regluing back on later so it will forgive some mistakes and frayed edges. All three openings have a small plastic frame around them that the skin tucks under, but I managed to pull the skin away OK - once you find a weakness and you see a gap, you're away.
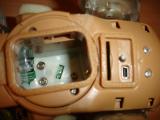 |
When you've loosened the skin around the battery area and the SD card slot, the next stage is the back feet. You need to first remove the two screws that fix the footplate, and once that is loose run your nail around the inside edge so you can remove the footplate altogether. The skin is also glued to a round white plastic ring that holds it tight at the base of the leg, held in place by four moulded ridges. You dont need to unglue the skin from the ring (although the previous owner had removed one, so I can show you how it fits on in the pic below) - once the skin on the sole is free all around the edge, you can push the ring down over the foot and then just pull down and stretch the skin to free the leg, pulling the edge over so that the leg is now coming out of the hole for the battery slot. After all the discussions on skin wear, I was totally amazed at how strong and resilient the skin actually is! Repeat the same process for the other back leg. Scully's previous owner had made two small 1cm slits in the skin, one each side of the battery compartment, which did give me more room at this stage, but I don't actually think it was necessary - I think the skin can probably take it.
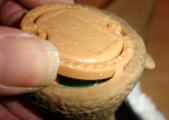 |
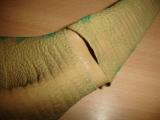
At this stage, I was assuming I'd need to take the tail section of the skin away and had started to undo the seam on the underside. The tail is only glued at the very tip so you can pull it back on itself, in effect turning it inside out, until you get to the end and need to separate it. I did pull the tail section off by rolling it back from the split I'd made first, in effect turning it inside out, and then pulling the rest of the skin from the back legs and butt over separately, but if I did it again I think I'd try it all in one. The main worry is putting too much stress on the tail itself, but the skin stretches enough for you to work your fingers inside to protect the tail structure as you go. I've tried to show just HOW stretchy the skin is below.
 |
You then have a half dressd Pleo, with the naked back end coming out of what was originally the opening in the skin for the battery, and you need to pull the whole skin along to the shoulder area and then repeat the same process on the front legs as for the back ones. The last and most complicated bit is the head, and you need to pull the skin off inside out over his nose like a jumper - I held onto the head with one hand as I pulled the skin over it and the head, so I could protect the neck structure inside from the stress, and also help take the weight of the skin from pulling on the neck wires too much.
The skin will come away freely until you start to see the eye sockets emerge. If you look at the naked Pleo head, you'll see a dark plate around each eye that's attached to the skull, this is the area that the skin is glued to - I ran my nail around the edge then kept rubbing at the glue with my thumb, and with a bit of time it came away pretty clean and leaving the black plastic plate still firmly attached to the head. There's then just the small areas around the nose to loosen and to remove the 'dentures'. I left the mouth plates still attached to the skin as they clip into the jaw through the skin and will come out easily if you press either side of the jaw - there are four white plastic tabs that fit into slots in the upper and lower jaws. Once the mouth parts are free from their anchor the whole skin will just come away.
 |
If I've not made something clear, or if you have any questions, please feel free to ask me. Unfortunately I wasn't expecting to explain this so I didn't take pictures as I went along! There are more images in 'Crewella's Scully Pics' in my album.
 Author
Topic: Skin Removal (With pics) (Read 24617 times)
Author
Topic: Skin Removal (With pics) (Read 24617 times)