|
When you're ready to string the beads, having them laid out in the order you are going to put them on the thread
saves time and helps prevent having to take half the beads you already strung back off the thread when you realize
you forgot one or strung one out of sequence. This is where a bead board or tray of some type helps enourmously.
One PleoWorld forum member (amjoie) suggests that if you have one of those big round magnifying glasses, you can
place the beads around the inside edge of the glass. The curved surface of the glass keeps the beads against the
metal rim, and because it's round it gives you an idea of how the necklace will look.
Also, think ahead a little as to what beads will go next to the clasp or knot. This way, if you plan to hide the
knot or crimp bead, you want to make sure the beads next to the knot or clasp have large enogh holes.
String length
To avoid ending up with a necklace thats too snug or hangs too loose, it is important to know how
many beads you need to string. You can determine the correct length for the necklace by taking the circumference
of the neck, subtracting the length of the clasp, and adding back 3 times the diameter of the beads. We know the
circumference of the Pleo neck is 5 1/2 inches (14cm). You may want to add a little extra slack for a
comfortable fit. The length of the clasp is the complete "assembly", including the clasp itself, the rings, and
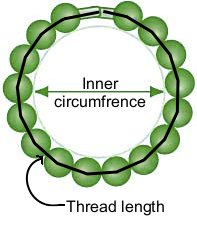
the clamshell or wire/string loop (if used). Because the necklace is so small, the diameter of the beads you string
has a significant effect on the inner circumference of the finished necklace, compensating for the beads diameter
will give you a perfectly finished, perfectly sized piece every time. The mathmatical formula for deteriming the
added length is 2Πr, where r is the radius of the bead. The simpler method is to take the size of the bead and
multipy by three.
For example, if we plan to make a necklace using a safety clasp and clamshell beads that come to 7/8,
inches long and string it with 4mm beads: We start with the Pleo's neck at 5 1/2 inches, add 1/4 inch for slack,
subtract 7/8 inch for the clasp, and we get 4 and 7/8 inches (or 124mm). Now, we add in 12mm for the bead diameter
(3 x 4mm) and end up with 136mm. Since we're using 4mm beads, we'll need to string (136 / 4) thirty-four beads.
Not all beads are round, or always perfectly sized and uniform, so before you complete the necklace,
Lay the strung beads in a curved shape (or around your Pleo's neck) before attaching the clasp. If the beads are too
tight, the necklace will not bend properly and abrasion can occur. At this point, you may want to add or subtract
a bead or two.
The thread should always be a couple of inches longer than the necklace. This is to give you room to
work with the thread and to tie knots. Once the necklace is complete, you can trim off the excess thread. And it's
always better to have the thread too long and waste a little, than to have it too short and have to start all over.
|
Quick Tips
Use a bead reamer to smooth any rough bead hole edges.
When using large, chunky beads, separate them with a single smaller bead to make it easier to bend around the neck.
An inexpensive way to separate your beads while you work with them is to use a plastic TV dinner tray. They usually
have three or four seperate partitions.
Use a piece of Vellux for a working surface; the nap is just right to keep beads from rolling, and you can buy
it by the yard or as inexpensive blankets at most stores (Walmart, etc.) and cut to whatever size you need.
After tying (and gluing) an elastic string necklace together, you can pull the knot into the hole of one of the
beads to hide it.
To carefully place glue on a knot, squeeze it slowly onto a needle or small piece of wire, then place the drop
of glue from the needle onto the knot. You will be better able to see the glue, and will have a LOT more control
over where it goes and how much you use.
|
WARNING!
Do not leave beads unattended around young children. They attract children's curiosity, and may pose a choking
hazard.
|
How Many Beads Do I Need?
| 2mm | 75 | |
5mm | 30 | |
8mm | 19 |
|---|
| 3mm | 50 | |
5.5mm | 27 | |
9mm | 17 |
|---|
| 4mm | 38 | |
6mm | 25 | |
10mm | 15 |
|---|
| 4.5mm | 34 | |
7mm | 22 | |
12mm | 13 |
|---|
Numbers are approximate. Beads may be irregular or non-uniform in shape, which will affect the bead count.
If you are knotting between beads, add 1-2mm per knot.
|
Silk / Nylon Tips
Before starting a new project, ALWAYS stretch your thread. This is a very important step to ensure the finished
necklace that will hold up over time. If you forget, your necklace will soon stretch out on its own from the weight
of the beads and won't have the same shape as it did when you made it. S-T-R-E-T-C-H !
Use a double or triple strand of threads for extra strength
Use a thread conditioner (like Thread Heaven) to coat & condition your thread before you start stringing beads.
It helps prevent unintentional knotting and fraying, protects thread from UV Rays that can cause color fading, and
it protects against moisture that can cause mold & mildew to build up under the beads.
If you put a drop of super glue (liquid, not gel type) on the end of your thread, when it dries after a few moments,
it stiffens and forms a "needle" to help string the beads.
|
Elastic string Tips
Overtime, the elastic in your necklace might develop a bit of slack. To restore the stretchiness, quickly dip the
necklace in boiling water for one or two seconds.
Smaller is better. Elastic bracelets are made to fit rather tightly, and they do stretch over time. So, its
usually a good idea to make sure they are ½ inch smaller than you would usually make, depending on the size of the
beads.
|
|

